
Using SmartParts in Microsoft Word
In the previous article, you learned how to create a SmartPart. Now it’s time to use SmartParts in your documents. In this article, we’ll walk you through the steps.
Step 1: Open the eformity side panel
To use SmartParts, you first need to open the eformity side panel in Microsoft Word. You can do this by clicking the ‘Show/Hide Side Panel’ button in the Microsoft Word ribbon.

Step 2: Enable edit mode
Once the side panel is open, navigate to the account menu to enable edit mode. You can do this by clicking your profile picture in the side panel. In the image below, this is circled in orange.

When the account menu is open, you can enable edit mode by toggling the switch. This is also circled in orange in the image below.

Step 3: Edit a document/template
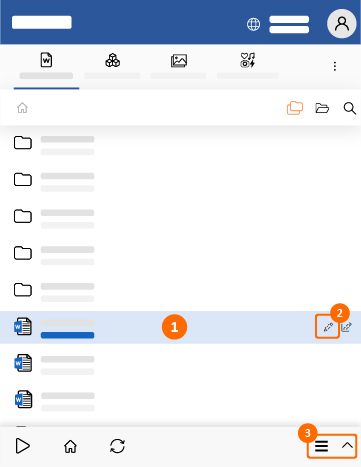
Now that edit mode is active, you can edit the template in which you want to insert a SmartPart. First, select the desired template in the side panel by clicking it. Then click the pencil icon or choose the ‘Edit’ option from the options menu.
Step 4: Insert the SmartPart
Once you’ve opened the desired template in edit mode, you can insert a SmartPart. Navigate to the ‘SmartParts’ tab. In the image below, this tab is active.

When you see the overview of all SmartParts, simply double-click the SmartPart you want to insert. This will add the SmartPart to your document in the following format:
[folderName:smartPartName]

Tip!
You can also use SmartParts in combination with If, Else, Switch, or Yes/No variables to conditionally show or hide them based on the value of a variable.